在项目研发的过程中,总会依赖众多的插件以及 Unity3D 自带的一些工具脚本等等,而这些插件和工具脚本的作者呢,有些人就偏爱于使用 JavaScript 来实现一些功能。如果在项目中恰好碰到了,而自己项目中使用的脚本语言与使用到的第三方的脚本并不是同一个语言,这个时候不同类型的脚本之间的互访问操作就很有必要了。
我们项目中有一个对 UI 整体进行模糊显示效果的需求,也就是当我们在 UI 界面上再次弹出二次提示确认框时,我们希望不出现多个界面重叠,导致整个画面很乱,视觉焦点不知道在哪儿的问题,我们希望在二次确认框弹出时,能将其后面的整个 UI 面板进行模糊显示,如此一来这个效果就会好不少,我们可以对比一下。


显然我们还是很有必要做一个模糊效果的,对吧。那么我们就找到了 Unity3D 自带的 Blur 脚本。这货在 Unity3D 的 Standard Assets 包中,我们需要通过 Unity3D Editor 的菜单 Assets -> Import Package -> Image Effects (Pro Only) 导入相应的资源包。然后我们就能在项目工程的 Assets/Standard Assets/Image Effects (Pro Only)/ 下找到 Blur.js 这个文件了,其实同一目录下还有一个 BlurEffect.cs 的文件,不过 Unity3D 官方目前推荐的是 Blur.js 这货,BlurEffect.cs 的这个已经是一个废弃的脚本了,官方文档上的描述如下:
This is now deprecated. Use Blur (Optimized) instead.
所以我们应该果断修改为使用 Blur.js 这货,看看这货的名字就晓得了,Blur (Optimized),名字里头都自带优化了,选它肯定没错了。好,那么我们就开始编码吧,因为这个模糊是需要动态控制其开关的,那么我们通常的做法呢就是动态地获取一下 UI 所使用的 Camera 上是否挂载有这个 Blur 组件,如果没有挂在载呢,就通过 AddComponent 方法将这个组件挂载上去,如果有的话,那么就直接将获得的组件设置的 enable 设置为 true 就好了,关闭的时候就将这个组件的 enable 设置为 false 就行了。
可是泥煤的这个 Blur 组件是个 JavaScript 代码写的呢,我们在 MonoDevelop 中写代码的时候,会发现自动提示不好使了,代码高亮中只要有 Blur 的地方都是个红色的错误代码颜色块在那儿,让人看着有点发怵啊,尼玛到底能不能用啊?我的第一反应就是这货估计不能直接在 C# 中使用,可是为啥这 JavaScript 代码中直接就能继承自 MonoBehavior 呢?反正有点懵,然后就 Google 了一下,也有人碰到这个问题,然后有个哥们给了一个解决方法就是把 Unity3D 提供的这个 JavaScript 语法的组件翻译成了一个 C# 版本的,擦。好吧,那我们就拿来主义了,直接拿进来,貌似可以耶,然后就屁颠屁颠地测试了一下,发现在 Editor 上是好使的,但是在 iOS 设备上不好使了,这是什么鬼?当然因为自己也是拿来主义,并没有仔细去查看人家的代码,想必代码是没啥问题的,真正的问题我会在后面单独描述。
既然怀疑可能是别人翻译的代码有问题(其实这个翻译非常简单,能出错也算是见鬼了,可是谁让程序运行出问题了呢,我只能怀疑人生了),那我就继续 Google 吧,然后发现实际上这个 C# 和 JavaScript 两者之间的交互是完全木有问题的,毕竟都是通过 Unity3D 的脚本引擎来编译的,既然支持两种语言编程,那么必然两者之间的通信是没有问题的,因为实际上我们通过脚本操作的所有对象本质上都是一样的东西才是啊,只是提供了两个不一样的方法而已。最终呢,我找到了这篇文章: Unity3D: JavaScript->C# or C#->JavaScript access ,文中明确地指出这两个脚本语言之间的交互是完全没有问题的但是前提是提供出来给 C# 或者 JavaScript 语言访问的脚本,必须放在 Standard Assets 目录或者 Plugins 目录下,因为这两个目录下的脚本是最先编译的模块,编译完了之后不论是啥语言写的脚本,实际上对于 Unity3D 来说,这就是一个组件对象,你用什么方式都是可以正常访问和操作的。
也就是说,我们可以对那些代码自动完成的提示不生效,代码高亮时红色警告的部分开启忽略模式了,这只是因为 MonoDevelop 自身对脚本语言支持的原因导致的,MonoDevelop 只是对 C# 语言有一个很好的支持,而对于 JavaScript 实际上它什么也做不了,我们就径直把代码写好,交给 Unity3D 去编译就好了,只要不报错,运行一下,发现效果正确。
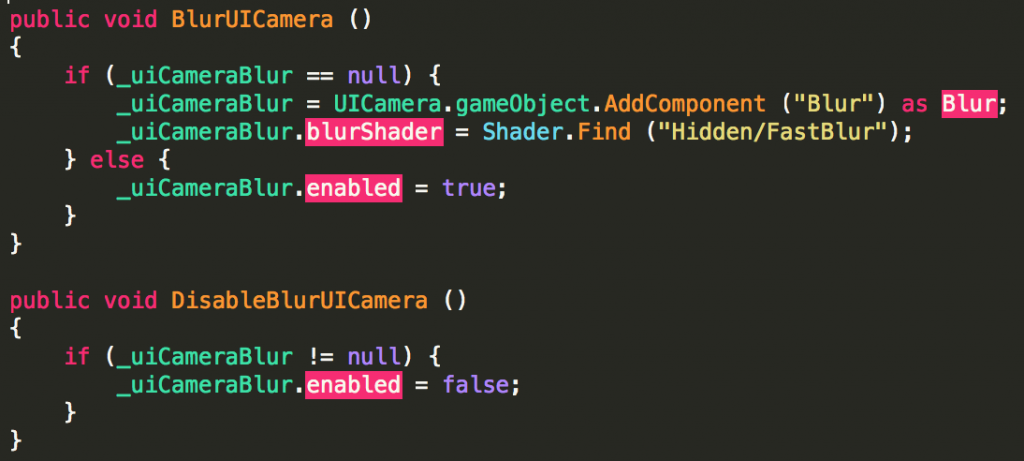
那我们就再放到手机上试试呗,谁知道在 iOS 上依然木有效果,这就奇怪了,那就一步步来呗,既然我们都用的是 Unity3D 官方提供的脚本和资源,而且官方声明了这个是支持所有平台的,那么应该不至于出现这种奇怪的问题的啊。那么首先排除是是否通过 AddComponent 动态挂载 Blur 组件导致的,试了一下貌似还真是这么回事,如果我们通过在场景或者 Prefab 中将 Blur 组件挂载到 Camera 上,那么运行的时候一切正常,如果采用 AddComponent 的方法的话,除了需要在代码里头通过 Shader.Find 方法找到我们需要的 Shader 资源还需要将其赋值给 Blur 组件的 blurShader 变量。
不过即便是我们按照上面的这个代码来做,测试表现只在 Editor 环境下有效,在 iOS 平台上依然没有效果,最终我们只能看 Log 了,不看不知道,一看就晓得了,错误日志如下:
– Completed reload, in 0.131 seconds
Missing shader in Camera (Blur)
UnityEngine.Debug:Internal_Log(Int32, String, Object)
UnityEngine.Debug:Log(Object)
PostEffectsBase:CheckShaderAndCreateMaterial(Shader, Material)
Blur:CheckResources()
PostEffectsBase:Start()
从这个日志中输出的信息来看,就是缺失了 Blur 脚本中使用到的名为 「Hidden/FastBlur」 的 Shader 了,那么为啥会缺失呢?为啥在 Editor 中就不会出现这个问题呢?这么一问就猜到可能是因为打包发布到 iOS 设备的过程中,这个 Shader 没有被一同打包发布到 iOS 设备的安装包里头。既然有了疑问,那就去找证据吧。我第一时间查看了 Shader.Find 方法的文档,文档中有这么一句:
When building a player, a shader will only be included if it is assigned to a material that is used in any scene or if the shader is placed in a “Resources” folder.
这已经非常明确地解释了问题出现的原因了,也就是说如果我们这个 Shader 不是放在一个名为 Resources 的目录(子目录也行)下,那么只有在场景中引用到了这个 Shader,它才会被打包到最终的执行游戏包中。这下问题就明了了,就是因为我们采用了完全动态的方法来添加这个 Blur 组件,而这个 Blur 组件依赖的这个 Shader 呢因为其处于 Standard Assets/Image Effects (Pro Only) 目录下又没有被其它场景中的任何对象引用和使用,所以 Unity3D Editor 在打包发布的时候呢,就没有计算到需要把这个 Shader 资源给包含进来,最终导致了这个问题。所以,我们知道了其实之前提到的改写 JavaScript 为 C# 的那位童鞋其实并没有做错,我们这个问题是因为其它原因导致的。
那么解决这个问题就是简单的在我们可能需要使用到 Blur 组件的某个对象上事先挂载一个 Blur 组件,但是将其 enable 设置为 false,这样一来呢,可以确保名为「Hidden/FastBlur」 的Shader会被打包进来,同时呢又可以满足我们动态开关 UI 界面模糊的功能了。
总结一下:
- Unity3D 中的 C# 和 JavaScript 脚本之间是可以互相访问并交互的,但是要求这些被访问和操作的 C# 和 JavaScript 组件必须放在名为 Standard Assets 或者 Plugins 目录下,这样保证被访问和操作的组件是第一时间被编译的,那么在这两个目录之外的其它脚本就可以随意使用它们了,同时呢,我们不要被 MonoDevelop 的一些表现给唬住;
- Blur 组件不生效的原因在于 Shader 资源没有被打包到执行程序中,而并不是其它别的原因,所以打蛇要打七寸就是这个道理。