标签归档:Unity3D Editor

如何搞定 UnityEngine.UI.dll is in timestamps but is not known in guidmapper… 错误

在使用 Unity 开发的过程中,不知道什么情况下就会碰到这么两个错误(根据平台和使用的 Unity 版本不同,路径可能不一样,我这边列出的也不是完整的路径):

UnityExtensions/Unity/GUISystem/4.6.9/UnityEngine.UI.dll is in timestamps but is not known in guidmapper…

UnityExtensions/Unity/GUISystem/4.6.9/Editor/UnityEditor.UI.dll is in timestamps but is not known in guidmapper…

有的人建议是直接把我们的 Project 目录下的 Library 目录直接删除掉,不过这样一来,重新再次打开 Unity Editor 的时候,整个工程的资源都需要重新导入,而且通常我们还是在移动平台模式下进行开发,也就是等它把资源导入进来之后,我们还需要做一次 Switch Platform 的操作,真的好慢好慢好慢啊(也许可以通过 Asset Cache Server 来提速,但是我没有用过,所以不敢乱说)。

那么我们有什么办法呢,这里介绍一个比较好的方法,总共分三步:

  1. 进入出错的两个 dll 文件所在目录中,将出错的两个 dll 文件重命名为任意文件名,例如:UnityEngine.UI.dll.backup 和 UnityEditor.UI.dll.backup;
  2. 重启 Unity Editor,等整个工程加载结束之后,我们会看到很多红色的错误日志输出,甭理它就好了,关闭 Unity Editor;
  3. 回到那两个 dll 文件所在的目录,将刚刚重命名的两个 dll 文件分别修改回来,UnityEngine.UI.dll 和 UnityEditor.UI.dll,然后再次启动 Unity Editor,接下来就是见证奇迹的时刻了。

好了,就是这么简单。

使用脚本在Unity3D Editor中完全删除Prefab中的ParticleSystem组件

今天碰到一个小问题需要通过脚本来批量将我们工程中的所有例子特效Prefab根节点的粒子发射器给干掉,那么好吧,开始动手吧。

ParticleSystem ps = go.GetComponent<ParticleSystem> ();
if (ps != null) {
    if (ps.renderer.sharedMaterial == null) {
        Debug.Log (string.Format ("{0} Render Has no Material", go.name));
    } else {
        var matName = ps.renderer.sharedMaterial.name;
        if (matName.StartsWith ("Default-Particle")) {
            Debug.Log (string.Format ("Prefab: {0}, Mat: {1}", go.name, matName));
            DestroyImmediate (ps, true);
        }
    }
}

执行一下,发现ParticleSystem组件确实木有了,但是留了一个小尾巴,就是我们在Unity3D Editor中查看被处理的Prefab时,还能在Inspector中看到一个Shader的小尾巴,如图:

default_particle_shader_tail

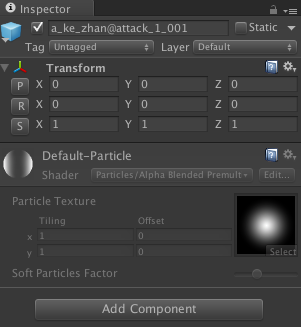
这个让我情何以堪啊,你知道的,我有轻微强迫症的,虽然貌似并不会影响程序的功能,但是我要是不知道原因,我岂不是很不爽,好吧,那么就对比一下手动将ParticleSystem组件Remove和通过我们这个脚本Destroy之后的Prefab文件之间究竟有甚么区别呢,这个时候就需要借助一下Unity3D提供的binary2text命令行工具了,Mac OSX上这个命令还在这个位置[Unity3D安装目录]/Unity.app/Contents/Tools/binary2text,通常就是/Applications/Unity/Unity.app/Contents/Tools/binary2text。使用这个工具将两个Prefab文件转成Text文件之后我们就可以使用文件对比工具来进行对比了(对比二进制神马的,真的让人很蛋疼啊,幸好Unity3D还提供了这么个鬼啊),对比就会发现,这个Shader是因为啥而存在的了。

compare_1 compare_2

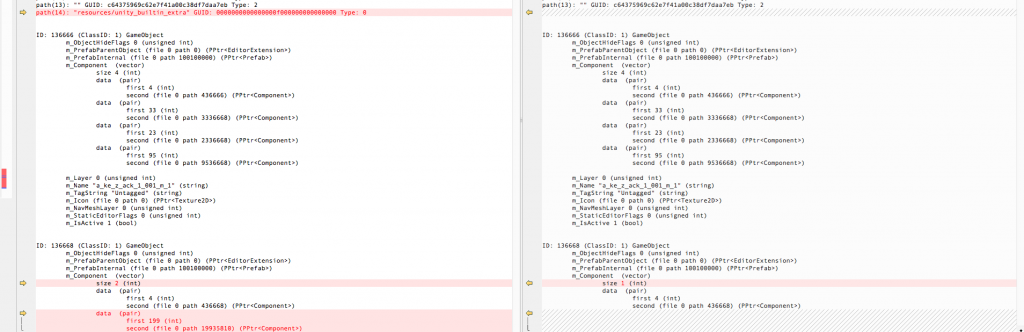
左侧有红色文本显示的是通过脚本Destroy ParticleSystem组件之后生成的Prefab的Text文件,右侧的是手动通过右键Remove Component删除ParticleSystem组件之后生成的Prefab的Text文件,对比之下我们能发现左侧文件中说明了一些问题:

  • 第一处红色文本表示多了一个内部资源的引用,看起来很像是Shader;
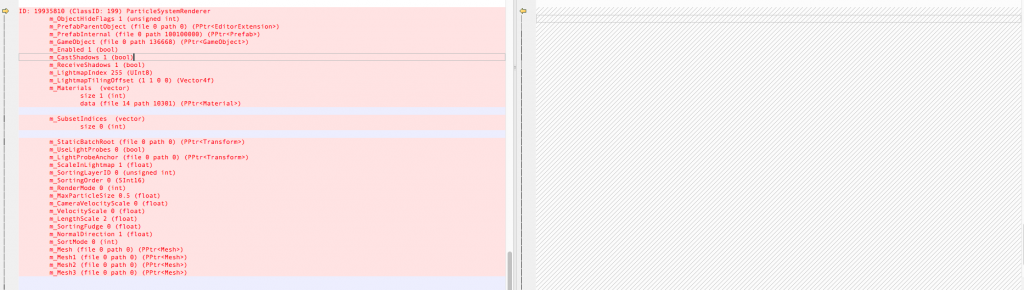
  • 第二处红色文本更是直接说明了问题,左侧表示有两个组件,组件的Id是19935810,刚好与第三处红色文本描述对应;
  • 第三处红色文本描述的是一个ParticleSystemRender组件的信息。

这么一看就知道原来还有一个隐藏的ParticleSystemRender组件没有被移除掉,因为这个Render是依附于ParticleSystem才存在的,所以不会在Inspector中单独显示,而是作为ParticleSystem的子组件Render进行显示的。那么我们就再修改一下我们的代码就好了。

ParticleSystem ps = go.GetComponent<ParticleSystem> ();
if (ps != null) {
    if (ps.renderer.sharedMaterial == null) {
        Debug.Log (string.Format ("{0} Render Has no Material", go.name));
    } else {
        var matName = ps.renderer.sharedMaterial.name;
        if (matName.StartsWith ("Default-Particle")) {
            Debug.Log (string.Format ("Prefab: {0}, Mat: {1}", go.name, matName));
            DestroyImmediate (ps, true);
        }
    }
}

ParticleSystemRenderer psr = go.GetComponent<ParticleSystemRenderer> ();
if (psr != null) {
    if (psr.sharedMaterial == null) {
        Debug.Log (string.Format ("{0} Render Has no Material", go.name));
        DestroyImmediate (psr, true);
    } else {
        var matName = psr.sharedMaterial.name;
        if (matName.StartsWith ("Default-Particle")) {
            Debug.Log (string.Format ("Prefab: {0}, Mat: {1}", go.name, matName));
            DestroyImmediate (psr, true);
        }
    }
}

也就是需要独立地将这个ParticleSystemRender组件也给DestroyImmediate一下就好了。搞定,洗洗睡了。

如何在Unity3D Editor脚本中使用Coroutine进行异步操作

今天在做编辑器中一个功能时,碰到一个这样的需求,Unity3D Editor脚本中会通过System.Diagnostics.Process这个类来调用外部的系统命令来执行一个操作,其实就是调用系统的Python命令执行一个Python脚本,来将Excel文件转换成文本数据。

[MenuItem ("LightHonor/Config/ImportExcel")]
static void ConvertXlsxToTxtConfig ()
{
    string txt2xlsxPythonFilePath = Directory.GetParent (Application.dataPath) 
        + Path.DirectorySeparatorChar.ToString () + "Docs" 
        + Path.DirectorySeparatorChar.ToString () + "Tools" 
        + Path.DirectorySeparatorChar.ToString () + "convert.py";
    if (Application.platform == RuntimePlatform.OSXEditor) {
        System.Diagnostics.ProcessStartInfo startInfo = new System.Diagnostics.ProcessStartInfo ("/usr/bin/python", txt2xlsxPythonFilePath);
        System.Diagnostics.Process convertProcess = new System.Diagnostics.Process ();
        convertProcess.StartInfo = startInfo;
        convertProcess.EnableRaisingEvents = true;
        convertProcess.Exited += new System.EventHandler (ConvertProcessExited);
        convertProcess.Start ();
    } else if (Application.platform == RuntimePlatform.WindowsEditor) {
        System.Diagnostics.ProcessStartInfo startInfo = new System.Diagnostics.ProcessStartInfo (@"C:\Python27\python.exe", txt2xlsxPythonFilePath);
        System.Diagnostics.Process convertProcess = new System.Diagnostics.Process ();
        convertProcess.StartInfo = startInfo;
        convertProcess.EnableRaisingEvents = true;
        convertProcess.Exited += new System.EventHandler (ConvertProcessExited);
        convertProcess.Start ();
    }
}

private static void ConvertProcessExited (object sender, System.EventArgs e)
{
    Debug.Log ("Convert Excel Xlsx Config To Text File Done!");
}

但是这样执行完ImportExcel菜单项之后,可能会出现我们通过外部的脚本修改了Unity3D需要使用到的文本文件,但是Unity3D未能及时更新AssetDatabase,导致Unity3D中读取到的文本文件还是执行ImportConfig菜单项之前的数据。那么我们能否直接在这个外部程序执行完毕的回调中执行AssetDatabase.Refresh()方法呢?不行,因为这些函数都只能在主线程里头调用,而这个回调函数是在启动外部程序的线程中执行的,所以在ConvertProcessExited()方法中访问AssetDatabase对象会抛出异常。这个时候我们可以通过EditorApplication的update委托来配合Coroutine机制来完成我们想要的功能。

关于EditorApplication如何支持Coroutine,这个是在GitHub上找到了一个很棒的参考,地址在这儿,链接页面中是一个完整的独立的EditorCoroutine的实现,借助于这个漂亮的工具,我们修改了代码,然后就能达成我们的需求了,在执行完外部转化的Python程序之后,及时通过AssetDatabase刷新Unity3D中需要使用到的文本文件,代码如下:

private static bool sConvertDone = false;

[MenuItem ("LightHonor/Config/ImportExcel")]
static void ConvertXlsxToTxtConfig ()
{
    string txt2xlsxPythonFilePath = Directory.GetParent (Application.dataPath) 
        + Path.DirectorySeparatorChar.ToString () + "Docs" 
        + Path.DirectorySeparatorChar.ToString () + "Tools" 
        + Path.DirectorySeparatorChar.ToString () + "convert.py";
    if (Application.platform == RuntimePlatform.OSXEditor) {
        System.Diagnostics.ProcessStartInfo startInfo = new System.Diagnostics.ProcessStartInfo ("/usr/bin/python", txt2xlsxPythonFilePath);
        System.Diagnostics.Process convertProcess = new System.Diagnostics.Process ();
        convertProcess.StartInfo = startInfo;
        convertProcess.EnableRaisingEvents = true;
        convertProcess.Exited += new System.EventHandler (ConvertProcessExited);
        convertProcess.Start ();
    } else if (Application.platform == RuntimePlatform.WindowsEditor) {
        System.Diagnostics.ProcessStartInfo startInfo = new System.Diagnostics.ProcessStartInfo (@"C:\Python27\python.exe", txt2xlsxPythonFilePath);
        System.Diagnostics.Process convertProcess = new System.Diagnostics.Process ();
        convertProcess.StartInfo = startInfo;
        convertProcess.EnableRaisingEvents = true;
        convertProcess.Exited += new System.EventHandler (ConvertProcessExited);
        convertProcess.Start ();
    }
    sConvertDone = false;
    EditorCoroutine.Start (RefreshAssetDatabase ());
}

static IEnumerator RefreshAssetDatabase ()
{
    while (!sConvertDone) {
        yield return 0;
    }
    AssetDatabase.Refresh ();
    Debug.Log ("Refresh Asset Database Done");
}

private static void ConvertProcessExited (object sender, System.EventArgs e)
{
    Debug.Log ("Convert Excel Xlsx Config To Text File Done!");
    sConvertDone = true;
}